Friday, February 24, 2017

Arduino Functions

in this part of the Arduino programming course, you will learn how to write your own functions and use them in your sketches. The structure and use of functions is fully explained.
Functions were briefly encountered in part 1 of this programming course where some basic facts about functions where stated – 1) each function must have a unique name, 2) the function name is followed by parentheses () 3) functions have a return type, e.g. void4) the body of a function is enclosed in opening and closing braces {}.
We will start by examining the structure of a function and then see how to write functions.

The Structure of a Function

Before a function can be used in a sketch, it must be created. The following code is an example of a function that was created to print a dashed line in the Arduino IDE.
void DashedLine()
{
    Serial.println("----------------");
}
The code above that creates the function is called the function definition. The image below shows the components of a function.
n this part of the Arduino programming course, you will learn how to write your own functions and use them in your sketches. The structure and use of functions is fully explained.
Functions were briefly encountered in part 1 of this programming course where some basic facts about functions where stated – 1) each function must have a unique name, 2) the function name is followed by parentheses () 3) functions have a return type, e.g. void4) the body of a function is enclosed in opening and closing braces {}.
We will start by examining the structure of a function and then see how to write functions.

The Structure of a Function

Before a function can be used in a sketch, it must be created. The following code is an example of a function that was created to print a dashed line in the Arduino IDE.
void DashedLine()
{
    Serial.println("----------------");
}
The code above that creates the function is called the function definition. The image below shows the components of a function.

Function Name

When we create a function, it must be given a name. The naming convention for functions is the same as for variables:
  • The function name can be made up of alphanumeric characters (A to Z; a to z; 0 to 9) and the underscore (_).
  • The function name may not start with a number i.e. the numbers 0 to 9.
  • A function name must not be used that is the same as a language keyword or existing function.
The function name ends with parentheses (). Nothing is passed to the example function above, so the parentheses are empty. Passing values or parameters to functions will be explained later in this tutorial.

Return Type

A function must have a return type. The example function does not return anything, so has a return type of void. Returning a value from a function will be explained in the next part of this course.

Function Body

The function body is made up of statements placed between braces {}. The statements make up the functionality of the function (what the function will do when it is called).
When a function is used, it is said to be "called". We will look at how to call a function next.

Calling a Function

To use the function that was created above, it must be called in a sketch as shown in the sketch below.
void setup() {
  Serial.begin(9600);
  
  DashedLine();
  Serial.println("| Program Menu |");
  DashedLine();
}

void loop() {
}

void DashedLine()
{
  Serial.println("----------------");
}

In the sketch above, the DashedLine() function is created at the bottom of the file and then called twice at the top of the file as shown in the image below.

To call a function, use the function name followed by opening and closing parentheses. Finally terminate the statement that calls the function with a semicolon.
Load the sketch to an Arduino and then open the terminal window. The sketch prints some text in a box as shown below.
Output from the function
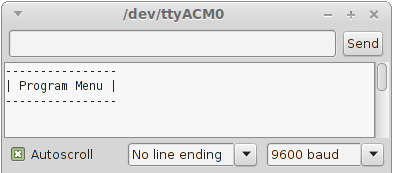
Output from the DashedLine() Function
The first time that the function is called, it prints the dashed line shown in the top of the image. Text is then written to the serial monitor window by the statement below the function call. The function is then called again to print the same dashed line that completes the box.

Why Use Functions

The function used in the example above is very simple, so all the benefits of using functions will not be seen immediately.
One advantage of using functions is that they avoid having to write the same code over and over again in a sketch which saves time and memory. Every time that a function is called, we are just reusing code that has been written once.
If a function needs to be modified, it only has to be done once and the modifications will take effect every place in a sketch that the function is called. If a function was not used, each place that the statements are found in a sketch to do a particular task would need to be located and modified.
Functions can be used to break a sketch up into pieces which make it more modular and easier to understand. Functions can be reused in other sketches.

Passing a Value to a Function

In the sketch above, the length of the line that the function prints out is fixed in the function. If we change the text that is in the box, it may not fit in the box properly. The function needs to be modified so that we can tell it what size line it must draw.
The above function can be modified to pass a value to it that will tell it how many characters long to make the line that it draws.
The modified sketch is shown below.
void setup() {
  Serial.begin(9600);
  
  // draw the menu box
  DashedLine(24);
  Serial.println("| Program Options Menu |");
  DashedLine(24);
}

void loop() {
}

void DashedLine(int len)
{
  int i;
  
  // draw the line
  for (i = 0; i < len; i++) {
    Serial.print("-");
  }
  // move the cursor to the next line
  Serial.println("");
}


The DashedLine() function in the above sketch is modified so that an integer value can be passed to it. The line needs to be 24 characters long to fit the new menu text into it, so we pass it a value of 24.
DashedLine(24);  // passing a value of 24 to the function
Of course the function has to be modified to handle the value that is being passed to it:
void DashedLine(int len)
{
  int i;
  
  // draw the line
  for (i = 0; i < len; i++) {
    Serial.print("-");
  }
  // move the cursor to the next line
  Serial.println("");
}
The function needs to be able to accept an integer value that is passed to it. The variable type and the name of the variable are inserted between the opening an closing parentheses after the function name.
void DashedLine(int len)
We can now use the len integer variable in the body of the DashedLine() function. The variable will contain whatever value was passed to it when the function was called.
The body of the sketch uses the len variable in a for loop to print out the correct number of dashes that make up the dashed line of the menu box.
The cursor is moved to the next line in the serial monitor by calling Serial.println(""); with an empty string.
After the function has run the last statement in its body, it is said to "return". When a function returns, program execution continues below the statement that called the function – i.e. the statement below the function call is run next.

Arduino Conditional Operator

The conditional operator is another decision making construct in Arduino programming.
The conditional operator consists of a condition, which can evaluate to true or false, and two expressions.
If the condition evaluates to true, the conditional expression becomes equal to the first expression. If the condition evaluates to false, the expression becomes equal to the second expression.
The rest of this part of the Arduino programming course will explain and illustrate how the conditional operator works.

Structure of the Conditional Operator

The conditional operator has the following structure:
condition ? first_expression : second_expression;
Where condition will evaluate to either true or false resulting in the entire expression becoming equal to the first expression (if condition evaluates to true) or the second expression (if condition evaluates to false).
As can be seen from the above code, the conditional expression consists of a question mark (?) and a colon (:).
An example sketch follows to show how to use the conditional expression.

Conditional Expression Example Sketch

The sketch below uses the conditional operator to determine which number is the bigger of two numbers.
int val1, val2, result;

void setup() {
  Serial.begin(9600);
  
  // change the values of val1 and val2 to see what the
  // conditional expression does
  val1 = 2;
  val2 = 5;
  // if val1 is bigger than val2, return val1
  // else if val1 is less than val2, return val2
  result = (val1 > val2) ? val1 : val2;
  
  // show result in serial monitor window
  Serial.print("The bigger number is: ");
  Serial.println(result);
}

void loop() {
}
Change the value of the variables val1 and val2 in the sketch, and the bigger of the two numbers will always be displayed in the Serial Monitor window of the Arduino IDE as the video below shows.

How the Sketch Works

The condition (val1 > val2) is evaluated and will either evaluate to true or false.

The Condition Evaluates to False

If val1 is less than val2, the condition evaluates to false. The conditional expression now takes on the value of the second expression – which is val2.
The variable result is then assigned the value of the expression which is val2 (5 in the sketch) and is the bigger number of the two values val1 and val2.

The Condition Evaluates to True

If we change the value of val1 to 12 so that we have:
val1 = 12;
val2 = 5;
val1 is now bigger than val2 and the condition evaluates to true. The conditional expression takes on the value of the first expression – which is val1.
The variable result is assigned the value of the expression which is val1. val1 is the bigger of the two values (with a value of 12).

Monday, February 13, 2017

Arduino switch and break Statements

The switch statement is similar to using if with multiple else-if constructs. switch is used in conjunction with break which will also be explained in this part of the course.
Using switch instead of multiple else-if constructs is easier to read and has more flexibility.

switch Statement Example

The following Arduino sketch shows the switch statement being used in conjunction with the break statement.
Load the sketch to the Arduino and then start the Serial Monitor window. Sending 1 from the serial monitor window to the Arduino will switch the on-board LED on and sending 2 will switch the LED off.
Sending 3 will show the menu of options that the sketch operates on. Sending any other character will bring up a default message showing that the option chosen is invalid.
void setup() {
  Serial.begin(9600);
  pinMode(13, OUTPUT);  // LED on pin 13 of UNO
}

char rx_byte = 0;

void loop() {
  if (Serial.available() > 0) {    // is a character available?
    rx_byte = Serial.read();
  
    switch (rx_byte) {
      case '1':
        digitalWrite(13, HIGH);
        Serial.println("LED is ON");
      break;
      
      case '2':
        digitalWrite(13, LOW);
        Serial.println("LED is OFF");
      break;
      
      case '3':
        Serial.println("------- MENU -------");
        Serial.println("1. Switch LED on.");
        Serial.println("2. Switch LED off.");
        Serial.println("3. This menu.");
        Serial.println("--------------------");
      break;
      
      default:
        Serial.println("Invalid option");
      break;
    } // end: switch (rx_byte)
  } // end: if (Serial.available() > 0)
}
How the sketch works will be explained later on this page, but first we must look at the structure of the switch statement and how the break statement works.
This video shows the above sketch in operation.

Structure of the switch Statement

The image below shows the structure of a switch statement.
Structure of an Arduino switch Statement
The switch statement has a variable (switch_var in the above image or rx_byte in the example sketch) which can be an integer (int) or character (char) variable.
The switch variable will be tested against the value in each case to see if they match. When a case is found that matches, the statements below the case will be run until the break keyword is reached. This will break the program flow out of the body of the switch statement and execution of the sketch will continue below the closing brace of the switch statement.
If no matching case is found, then the code under the default keyword will be run until its break statement is found.

How the Example Sketch Works

In the example sketch, the switch statement is placed inside an if statement in the main loop. The switch statement will then only run if a new character is received from the Serial Monitor window.
When a character is received from the Serial Monitor window, the switch statement will check for a matching case value. If the character '1' is received, then the LED is switched on and a message displayed in the Serial Monitor window.
If '2' is received, the LED is switched off. '3' displays a menu of the options available in the sketch.
If any character is sent that does not match the characters in any of the case statements, then the code in the default part of the switch body is run which displays a default message.

The break Statement

The break statement is used in the example sketch to break out of the body of the switch statement.
break can also be used to break out of any loop such as a while or for loop. As an example, a certain condition can be tested for in a loop using an if statement and if the statement evaluates to true, the break statement can be run to break out of the loop.

Logical Operators

Logical operators can be used with if and if-else to simplify and extend decision making.
The three logical operators are OR (||), AND (&&) and NOT (!) which are explained and demonstrated in this part of the course.

The OR Logical Operator (||)

The OR logical operator is written in sketches as two vertical pipe symbols (||) found on the same key as the backslash (\) on USA and other keyboards. Pressing Shift + \ (Shift and back slash keys) will type the vertical pipe character.
The following sketch demonstrates the use of the OR logical operator to check for the upper and lower-case versions of an alphabet character.
void setup() {
  Serial.begin(9600);
  pinMode(13, OUTPUT);  // LED on pin 13 of UNO
}

void loop() {
  char rx_byte;
  
  if (Serial.available() > 0) {    // is a character available?
    rx_byte = Serial.read();       //
    if (rx_byte == 'a' || rx_byte == 'A') {
      digitalWrite(13, HIGH);
    }
    else {
      digitalWrite(13, LOW);
    }
  }
}
The sketch will switch the LED on the Arduino Uno board on if the lower-case character 'a' or the upper-case character 'A' is sent from the serial monitor window. If any other character is sent, the LED is switched off.

How the Logical OR Operator Works

The code below is taken from the above sketch and shows the logical OR operator.
if (rx_byte == 'a' || rx_byte == 'A') {
  digitalWrite(13, HIGH);
}
The code in the body of the if statement will run if the variable rx_byte contains 'a' OR (||) if it contains 'A'. The OR operator has been used to test for one or the other character (A OR a).
The code can be modified to switch the LED on if the character 'a' or the character 'b' or the character 'c' is received, as this next code demonstrates.
if ((rx_byte == 'a') || (rx_byte == 'b') || (rx_byte == 'c')) {
  digitalWrite(13, HIGH);
}
In the above code, each equal to relational operator comparison has been put in parentheses () to make the code easier to read. This also avoids any misunderstanding about which operator is evaluated first (does the == or the || get evaluated first?).
The == has a higher precedence than the || which means that == is evaluated first. Parentheses have the highest precedence, so anything placed in parentheses will be evaluated first. In this case it is not necessary to place the parentheses, but makes it easier to read.

The AND Logical Operator (&&)

The next sketch demonstrates the use of the logical AND operator. The sketch tests to see that a sequence of two characters has been received before turning the LED on.
void setup() {
  Serial.begin(9600);
  pinMode(13, OUTPUT);  // LED on pin 13 of UNO
}

char first_char = 0;

void loop() {
  char rx_byte;
  
  if (Serial.available() > 0) {    // is a character available?
    rx_byte = Serial.read();       // read the character
    if ((first_char == 'c') && (rx_byte == 'd')) {
      digitalWrite(13, HIGH);
    }
    else {
      first_char = rx_byte;        // save the character for next comparison
      digitalWrite(13, LOW);
    }
  }
}
In this sketch, two characters must be sent in the right order to switch the LED on. First 'c' must be sent, followed by 'd'.
This video shows the above sketch operating:

How the Logical AND Operator Works

The AND operator from the above sketch is shown below.
if ((first_char == 'c') && (rx_byte == 'd')) {
  digitalWrite(13, HIGH);
}
The LED will only switch on when the variable first_char contains 'c' AND the variable rx_byte contains 'd'.
The variable first_char is used to store the current character received so that the next time the if statement is evaluated, we can see if it was followed by 'd' and if it contains 'c'.

The Logical NOT Operator (!)

The NOT operator can be used to check if a variable contains the value 0 – in other words it can be used to check if a variable evaluates to false.
int x = 0;
if(!x) {
 // if not x - if x evaluates to false, code here will run
}

// this code is another way of writing the above code
if (x == 0) {
}