Tuesday, January 31, 2012

Control GLCD with MikroC

Discription :

n the first part of this tutorial, we discussed about Winstar’s WDG0151-TMI GLCD module, which is a 128×64 pixel monochromatic display built with KS0108B and KS0107B compatible display controllers. The module was interfaced to a PIC16F887 microcontroller and a test program was written in C to demonstrate how to implement the KS0108 instruction set in the firmware of PIC to activate display pixels on the screen. We wrote our subroutine programs that would turn the GLCD on, move the display location to a specified row and column, and draw a pixel at a given coordinates. You might have realized it by now that how much of effort is required to write the firmware for just plotting a point on a GLCD screen. Today’s discussion will focus more on using the built-in GLCD library routines of mikroC Pro for PIC compiler, which will make your life a lot easier if you are using a graphical LCD in your project.
Using MikroC Pro for PIC GLCD library
GLCD Library of mikroC Pro for PIC
The mikroC Pro for PIC provides GLCD library for a 128×64 pixel graphical LCD with Samsung KS0108/KS0107 controller chips. The library routines are categorized into two types: basic andadvanced. Before using any library routine, following pin definitions is required. For our case (see the circuit diagram in the  first part) where PORTD is used for data and PORTB pins for control signals, the GLCD pin settings should be defined as follows. Remember that the data lines must be on a single port.
// glcd pinout settings
 char GLCD_DataPort at PORTD;
 sbit GLCD_CS1 at RB0_bit;
 sbit GLCD_CS2 at RB1_bit;
 sbit GLCD_RS at RB2_bit;
 sbit GLCD_RW at RB3_bit;
 sbit GLCD_EN at RB5_bit;
 sbit GLCD_RST at RB4_bit;
 sbit GLCD_CS1_Direction at TRISB0_bit;
 sbit GLCD_CS2_Direction at TRISB1_bit;
 sbit GLCD_RS_Direction at TRISB2_bit;
 sbit GLCD_RW_Direction at TRISB3_bit;
 sbit GLCD_EN_Direction at TRISB5_bit;
 sbit GLCD_RST_Direction at TRISB4_bit;
Basic routines:
  • Glcd_Init : Initializes the Glcd module
  • Glcd_Set_Side: Selects the Glcd side. Example, Glcd_Set_Side(0) and Glcd_Set_Side(62)both select the left side of the GLCD. Values from 64-127, such as Glcd_Set_Side(67), selects the right side of the GLCD.
  • Glcd_Set_X : Sets x-axis position from the left border of Glcd within the selected side. Example, Glcd_Set_X(25).
  • Glcd_Set_Page : Selects page (0-7) of the Glcd.
  • Glcd_Read_Data : Reads one byte of data from the current location of Glcd memory and moves to the next location.
  • Glcd_Write_Data : Writes one byte of data from the current location of Glcd memory and moves to the next location.
Advanced routines:
  • Glcd_Fill : Fills GLCD display RAM with a byte pattern. If the byte is 0, it will clear the display. If it is 0xFF, then it will fill the entire display with 1.
  • Glcd_Dot : Draws a dot on Glcd at given coordinates with a specified color. It is used asGlcd_Dot(x, y, color), where x = 0-127, and y=0-63, and color = 0-2. The parameter colordetermines a dot state: 0 clears dot, 1 puts a dot, and 2 inverts the dot state.
  • Glcd_Line : Draws a line joining two specified point coordinates and a given color value (0-2).
  • Glcd_V_Line : Draws a vertical line passing through two points with the same x-coordinate. It also accepts color parameter.
  • Glcd_H_Line : Draws a horizontal line passing through two points with the same y-coordinate. It also accepts color parameter.
  • Glcd_Rectangle : Draws a rectangle with specified top left and bottom right corner coordinates. It also accepts color parameter.
  • Glcd_Box : Draws a box with specified top left and bottom right corner coordinates. Unlike in Glcd_Rectangle, the color parameter here is the fill color of the box.
  • Glcd_Circle : Draws a circle with specified center coordinates and radius. It also accepts color parameter.
  • Glcd_Set_Font: As it was mentioned earlier in Part1, KS0108 controller does not have a built-in character generator and therefore fonts must be written in the firmware of the external microcontroller. This is a time consuming task as you need to determine data values for each letter to display. For simplicity, mikroElektronika provides the following demo fonts with mikroC Pro for PIC compiler.
    • Font_Glcd_System3x5
    • Font_Glcd_System5x7
    • Font_Glcd_5x7
    • Font_Glcd_Character8x7
    These fonts are used by Glcd_Write_Char and Glcd_Write_Text functions (defined below) to display character and text. The syntax for defining font is,
Glcd_Set_Font (const char *activeFont, unsigned short aFontWidth, unsigned  shortaFontHeight, unsigned int aFontOffs);
where parameters are:
  • activeFont: font to be set. Needs to be formatted as an array of char
  • aFontWidth: width of the font characters in dots.
  • aFontHeight: height of the font characters in dots.
  • aFontOffs: number that represents difference between the mikroC PRO for PIC character set and regular ASCII set. Demo fonts supplied with the library have an offset of 32.
So, if you want to use the Font_Glcd_5x7, you can define the font as,
                Glcd_Set_Font(Font_Glcd_5x7, 5, 7, 32);
Circuit diagram
It is the same as described in Part 1 of this tutorial and I am using UNI-DS6 development board for demonstration.
Software
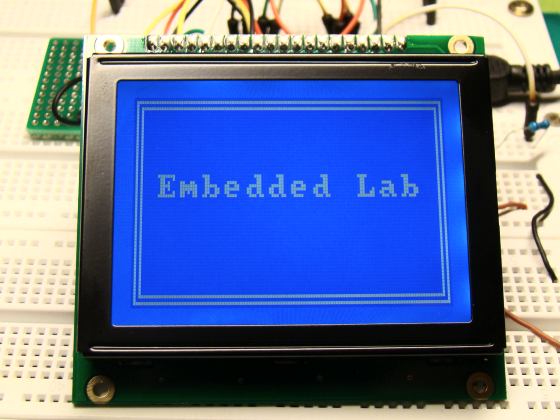
The following program is written in mikroC Pro for PIC compiler for demonstrating the GLCD library routines described above. The first part of the program draws horizontal and vertical lines, rectangle, circle, and a filled box on the GLCD. The second part writes texts in all eight pages (0-7) using Font_Glcd_5x7. At the end, bigger font size (Font_Glcd_Characters_8x7) is used to write “Embedded Lab” at the center of the screen.
/*
 * Project name: Testing GLCD with PIC16F887
   Embedded-Lab.com, Jan 02, 2012.

 * Description:
     This routine demonstrates how to use MikroC Pro for PIC GLCD library
     routines for displaying shapes and texts of various font size.
      * Test configuration:
     MCU:             PIC16F887
     Dev.Board:       UNI-DS6
     Oscillator:      HS, 10.0000 MHz
     Ext. Modules:    GLCD 128x64, KS108/107 controller

*/

// Glcd module connections
char GLCD_DataPort at PORTD;

sbit GLCD_CS1 at RB0_bit;
sbit GLCD_CS2 at RB1_bit;
sbit GLCD_RS  at RB2_bit;
sbit GLCD_RW  at RB3_bit;
sbit GLCD_RST  at RB4_bit;
sbit GLCD_EN at RB5_bit;

sbit GLCD_CS1_Direction at TRISB0_bit;
sbit GLCD_CS2_Direction at TRISB1_bit;
sbit GLCD_RS_Direction  at TRISB2_bit;
sbit GLCD_RW_Direction  at TRISB3_bit;
sbit GLCD_RST_Direction  at TRISB4_bit;
sbit GLCD_EN_Direction at TRISB5_bit;
// End Glcd module connections

void Delay2S(){             // 2 seconds delay function
  Delay_ms(2000);
}

void main() {
  ANSEL  = 0;                                      // Configure AN pins as digital
  ANSELH = 0;
  C1ON_bit = 0;                                    // Disable comparators
  C2ON_bit = 0;
  TRISD = 0x00;
  TRISB = 0x00;
  Glcd_Init();             // Initialize GLCD
  Glcd_Fill(0x00);         // Clear GLCD

  do {
      Glcd_V_Line(0, 63, 64, 1);
      Glcd_H_Line(0, 127, 32, 1);
      Delay2s();
      Glcd_Rectangle(10,5,117,57,1);     // Draw rectangle, color is 1
      Delay2s();
      Glcd_Circle(64,32, 15, 1);
      Delay2s();
      Glcd_Fill(0xFF);                  // Fill Glcd with all 1s
      Delay2s();
      Glcd_V_Line(0, 63, 64, 0);
      Glcd_H_Line(0, 127, 32, 0);
      Delay2s();
      Glcd_Rectangle(10,5,117,57,0);     // Draw rectangle, color is 0 now
      Delay2s();
      Glcd_Circle(64,32, 15, 0);
      Delay2s();
      Glcd_Fill(0x00);                  // Clear GLCD
      Delay2s();
      Glcd_Box(10,5,117,57,1);
      Delay2s();
      Glcd_Fill(0x00);                  // Clear GLCD
      Delay2s();

      Glcd_Set_Font(Font_Glcd_5x7, 5, 7, 32);
      Glcd_Write_Text("This is Page 0", 10, 0, 1);
      Glcd_Write_Text("This is Page 1", 10, 1, 1);
      Glcd_Write_Text("This is Page 2", 10, 2, 1);
      Glcd_Write_Text("This is Page 3", 10, 3, 1);
      Glcd_Write_Text("This is Page 4", 10, 4, 1);
      Glcd_Write_Text("This is Page 5", 10, 5, 1);
      Glcd_Write_Text("This is Page 6", 10, 6, 1);
      Glcd_Write_Text("This is Page 7", 10, 7, 1);
      Delay2s();
      Glcd_Fill(0x00);         // Clear GLCD
      Glcd_Set_Font(Font_Glcd_Character8x7, 8, 7, 32);
      Glcd_Write_Text("Embedded Lab", 8, 3, 2);   // Write string
      Delay2s();
      Glcd_Fill(0x00);         // Clear GLCD
  } while(1);
}
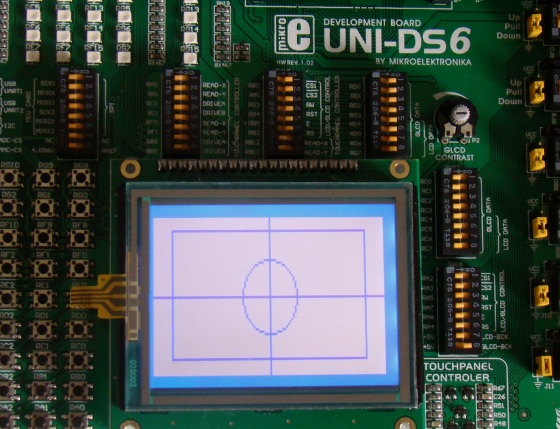
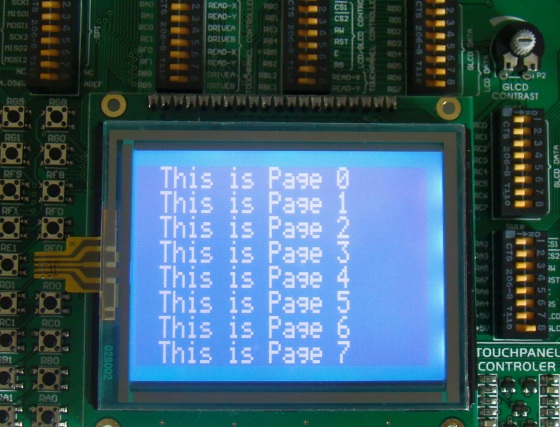
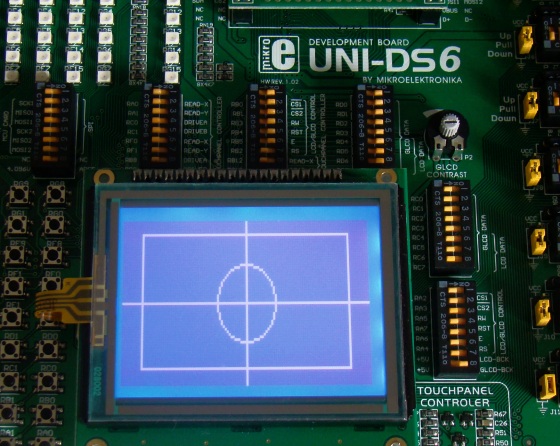
The pictures below show some of the outputs of this program. This has been tested on UNI-DS6 development board with PIC16F887 microcontroller.
Drawing lines, rectangle, and circle using GLCD library
Same thing with inverted color
Filled box
Displaying GLCD page numbers with 5x7 font size
Text display with 8x7 font
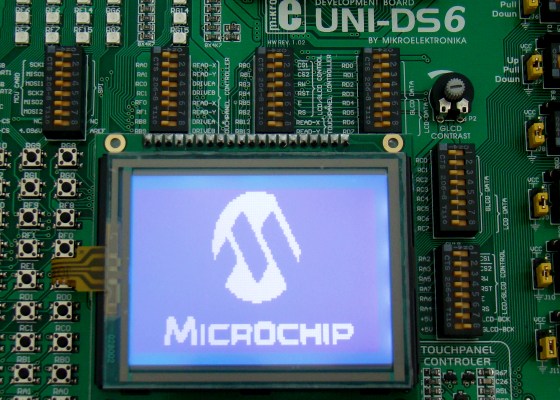
You can also display a 128×64 pixels monochromatic bitmap image on the GLCD. For this you need to first convert the bitmap image file into a data array. The following link takes you to a tutorial page which describes how to do that.
How to use mikroElektronika’s GLCD bitmap editor tool to convert a BMP image in to a data array

Displaying Microchip logo using GLCD bitmap editor tool

Monday, January 30, 2012

control humidity and temperature


Discription :

Measurement and control of temperature and relative humidity finds applications in numerous areas. These days devices are available which have both temperature and humidity sensors with signal conditioning, ADC, calibration and communication interface all built inside them. The use of such smart sensors greatly simplify the design and reduces the overall cost. We discussed in past about Humidity and temperature measurements with Sensirion’s SHT1x/SHT7x sensors. These sensors are capable of measuring both temperature and relative humidity and provide fully calibrated digital outputs. While  SHT1x/SHT7x are very accurate sensors, they are still expensive for hobbyists use. This articles discusses the DHT11 sensor which also provides calibrated digital outputs for temperature and humidity but is relatively lot cheaper than the Sensirion sensors. The DHT11 sensor uses a proprietary 1-wire protocol which we will be exploring here and implementing with the PIC16F628A microcontroller that will receive the temperature and humidity values from the sensor and display them on a 16×2 character LCD.
Interfacing DHT11 sensor with PIC16F628A
About DHT11 sensor
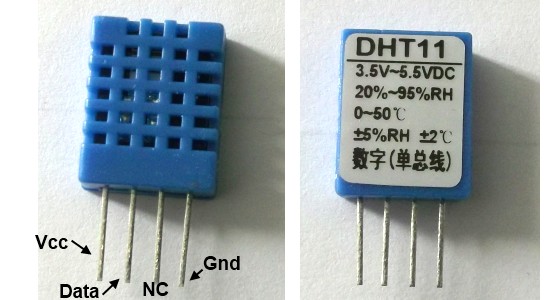
The DHT11 sensor comes in a single row 4-pin package and operates from 3.5 to 5.5V power supply. It can measure temperature from 0-50 °C with an accuracy of ±2°C and relative humidity ranging from 20-95% with an accuracy of  ±5%. The sensor provides fully calibrated digital outputs for the two measurements. It has got its own proprietary 1-wire protocol, and therefore, the communication between the sensor and a microcontroller is not possible through a direct interface with any of its peripherals. The protocol must be implemented in the firmware of the MCU with precise timing required by the sensor.
DHT11 sensor comes in a single row 4-pin package
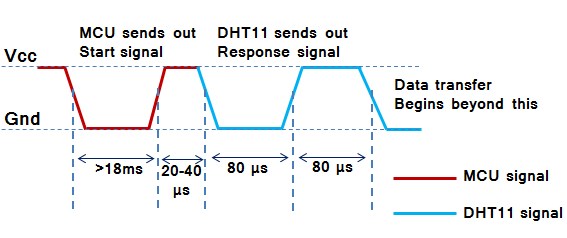
The following timing diagrams describe the data transfer protocol between a MCU and the DHT11 sensor. The MCU initiates data transmission by issuing a “Start” signal. The MCU pin must be configured as output for this purpose. The MCU first pulls the data line low for at least 18 ms and then pulls it high for next 20-40 μs before it releases it. Next, the sensor responds to the MCU “Start“  signal by pulling the line low for 80 μs followed by a logic high signal that also lasts for 80 μs. Remember that the MCU pin must be configured to input after finishing the “Start“ signal. Once detecting the response signal from the sensor, the MCU should be ready to receive data from the sensor. The sensor then sends 40 bits (5 bytes) of data continuously in the data line. Note that while transmitting bytes, the sensor sends the most significant bit first.
"Start" and "Response" signals
The 40-bit data from the sensor has the following structure.
Data (40-bit) = Integer Byte of RH + Decimal Byte of RH + Integer Byte of Temp. + Decimal Byte of Temp. + Checksum Byte
For DHT11 sensor, the decimal bytes of temperature and humidity measurements are always zero. Therefore, the first and third bytes of received data actually give the numeric values of the measured relative humidity (%) and temperature (°C). The last byte is the checksum byte which is used to make sure that the data transfer has happened without any error. If all the five bytes are transferred successfully then the checksum byte must be equal to the last 8 bits of the sum of the first four bytes, i.e.,
Checksum = Last 8 bits of (Integer Byte of RH + Decimal Byte of RH + Integer Byte of Temp. + Decimal Byte of Temp.) 
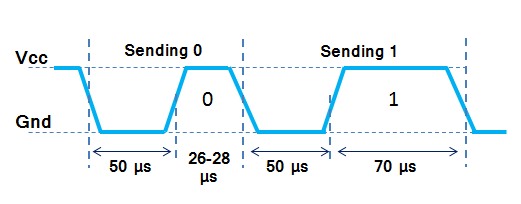
Now lets talk about the most important thing, which is signalling for transmitting “0″ and “1″. In order to send a bit of data, the sensor first pulls the line low for 50 μs. Then it raises the line to high for 26-28 μs if it has to send “0″, or for 70 μs if the bit to be transmitted is “1″. So it is the width of the positive pulse that carries information about 1 and 0.
Timing difference for transmitting "1s" and "0s"
Start, Response and Data signals in sequence
At the end of the last transmitted bit, the sensor pulls the data line low for 50 μs and then releases it. The DHT11 sensor requires an external pull-up resistor to be connected between its Vcc and the data line so that under idle condition, the data line is always pulled high. After finishing the data transmission and releasing the data line, the DHT11 sensor goes to the low-power consumption mode until a new “Start” signal arrives from the MCU.
Circuit diagram
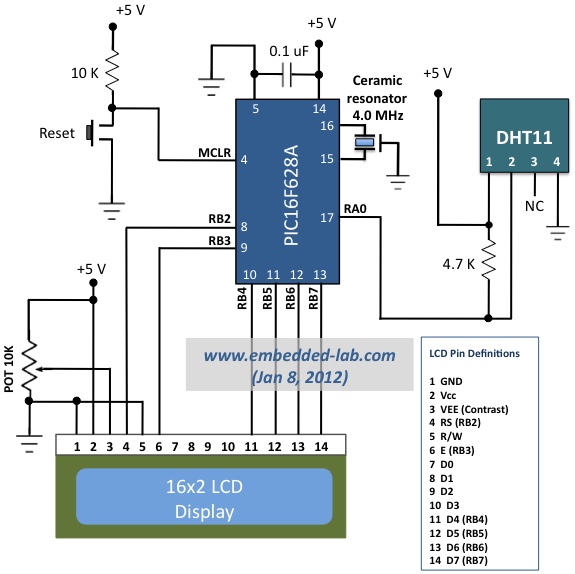
Here is the circuit diagram showing the DHT11 sensor and a HD44780-based character LCD interfaced to the PIC16F628A microcontroller. The microcontroller runs at 4.0 MHz clock using an external resonator connected between OSC1 (16) and OSC2 (15) pins. The use of 4.0 MHz clock makes the timing calculation easier as 1 machine cycle becomes 1 μs. The timing information will be used to calculate the width of the received data pulse from the sensor so that we could identify if it is carrying a 1 or 0.
Circuit connections for PIC16F628A and DHT11 sensor
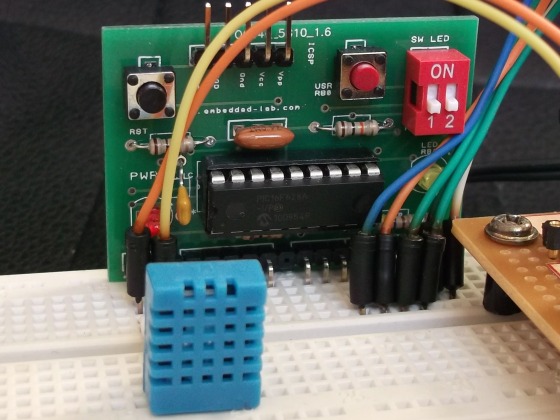
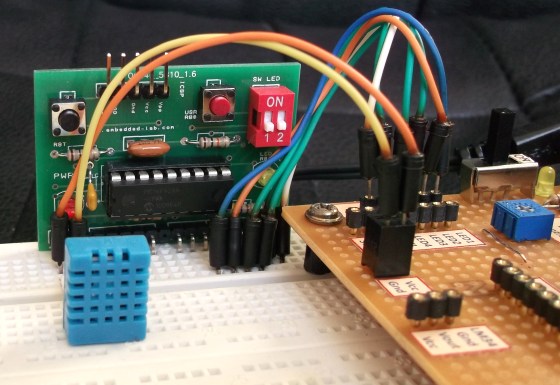
The following pictures show the circuit setup on a breadboard. Don’t get confused with the four LEDs and tact switches shown on the perforated board. They have nothing to do with this project. They are there because I am using my DIY Experimenter’s I/O board for the LCD part of this project. Similarly, I am using my 18-pin PIC16F board for easy prototyping with the PIC16F628A microcontroller.
Complete setup of the circuit
PIC16F628A module and the DHT11 sensor are plugged into the breadboard
Software
Writing a software for DHT11 sensor is little more challenging than the hardware part because of the timing conditions for 1s and 0s. I have written sub-routines in mikroC Pro for PIC for initializing the DHT11 sensor and reading the 40-bit of data in sequence. I have used Timer2 module to keep track of the width of the received data pulse, which is required to identify if the received bit is 1 or 0. When a low-to-high pulse is detected at the beginning of any data bit, TMR2 is cleared and turned ON. Since the clock frequency used here is 4.0 MHz, the TMR2 increments by 1 in every 1 μs. The TMR2 is stopped whenever the data pulse is low again. The value of the TMR2 register gives you the the width of the data pulse in μs. I am using 40 μs as the threshold for identifying 0 and 1. If the TMR2 is greater than 40, it means the received bit is 1, else it is 0. Here is the complete source code written in mikroC Pro for PIC. It can be easily adapted to any other platform, but remember that if you are using a different clock frequency you should have to modify the timer operation accordingly.
// LCD module connections
sbit LCD_RS at RB2_bit;
sbit LCD_EN at RB3_bit;
sbit LCD_D4 at RB4_bit;
sbit LCD_D5 at RB5_bit;
sbit LCD_D6 at RB6_bit;
sbit LCD_D7 at RB7_bit;
sbit LCD_RS_Direction at TRISB2_bit;
sbit LCD_EN_Direction at TRISB3_bit;
sbit LCD_D4_Direction at TRISB4_bit;
sbit LCD_D5_Direction at TRISB5_bit;
sbit LCD_D6_Direction at TRISB6_bit;
sbit LCD_D7_Direction at TRISB7_bit;

sbit Data at RA0_bit;
sbit DataDir at TRISA0_bit;
char message1[] = "Temp = 00.0 C";
char message2[] = "RH   = 00.0 %";
unsigned short TOUT = 0, CheckSum, i;
unsigned short T_Byte1, T_Byte2, RH_Byte1, RH_Byte2;

void StartSignal(){
  DataDir = 0;     // Data port is output
  Data    = 0;
  Delay_ms(25);    // Low for at least 18us
  Data    = 1;
  Delay_us(30);    // High for 20-40 us
  DataDir = 1;     // Data port is input

}

unsigned short CheckResponse(){
  TOUT = 0;
  TMR2 = 0;
  T2CON.TMR2ON = 1;      // Start TMR2 while waiting for sensor response
  while(!Data && !TOUT); // If there's no response within 256us, the Timer2 overflows
  if (TOUT) return 0;    // and exit
  else {
   TMR2 = 0;
   while(Data && !TOUT);
   if (TOUT) return 0;
   else {
    T2CON.TMR2ON = 0;
    return 1;
   }
  }
}

unsigned short ReadByte(){
  unsigned short num = 0, t;
  DataDir = 1;
  for (i=0; i<8; i++){
   while(!Data);
   TMR2 = 0;
   T2CON.TMR2ON = 1;  // Start TMR2 from 0 when a low to high data pulse
   while(Data);       // is detected, and wait until it falls low again.
   T2CON.TMR2ON = 0;  // Stop the TMR2 when the data pulse falls low.
   if(TMR2 > 40) num |= 1<<(7-i);  // If time > 40us, Data is 1
  }
  return num;
}

void interrupt(){
  if(PIR1.TMR2IF){
   TOUT = 1;
   T2CON.TMR2ON = 0; // stop timer
   PIR1.TMR2IF  = 0; // Clear TMR0 interrupt flag
  }
}

void main() {
  unsigned short check;
  TRISB = 0b00000000;
  PORTB = 0;
  TRISA = 0b00100001;
  CMCON = 7;
  INTCON.GIE = 1;    //Enable global interrupt
  INTCON.PEIE = 1;   //Enable peripheral interrupt
  // Configure Timer2 module
  PIE1.TMR2IE = 1;  // Enable Timer2 interrupt
  T2CON = 0;        // Prescaler 1:1, and Timer2 is off initially
  PIR1.TMR2IF =0;   // Clear TMR INT Flag bit
  TMR2 = 0;
  Lcd_Init();
  Lcd_Cmd(_Lcd_Clear);
  Lcd_Cmd(_LCD_CURSOR_OFF);

  do {
    Delay_ms(1000);
    StartSignal();
    check = CheckResponse();
    if (!check) {
     Lcd_Cmd(_Lcd_Clear);
     Lcd_Out(1, 1, "No response");
     Lcd_Out(2, 1, "from the sensor");
    }
    else{

     RH_Byte1 = ReadByte();
     RH_Byte2 = ReadByte();
     T_Byte1 = ReadByte();
     T_Byte2 = ReadByte();
     CheckSum = ReadByte();
     // Check for error in Data reception
     if (CheckSum == ((RH_Byte1 + RH_Byte2 + T_Byte1 + T_Byte2) & 0xFF))
     {
      message1[7]  = T_Byte1/10 + 48;
      message1[8]  = T_Byte1%10 + 48;
      message1[10] = T_Byte2/10 + 48;
      message2[7]  = RH_Byte1/10 + 48;
      message2[8]  = RH_Byte1%10 + 48;
      message2[10] = RH_Byte2/10 + 48;
      message1[11] = 223;     // Degree symbol
      Lcd_Cmd(_Lcd_Clear);
      Lcd_Out(1, 1, message1);
      Lcd_Out(2, 1, message2);
      }

      else{
       Lcd_Cmd(_Lcd_Clear);
       Lcd_Out(1, 1, "Checksum Error!");
       Lcd_Out(2, 1, "Trying Again ...");
      }
    }

  }while(1);
}
You can also simplify the ReadByte subroutine without using the Timer2 module. The following version of ReadByte subroutine works equally well. Once the data pin is detected high, wait for 40 μs and check the data line again. If it is still high, it is 1, else 0.
unsigned short ReadByte(){
  unsigned short num = 0, t;
  DataDir = 1;
  for (i=0; i<8; i++){
   while(!Data);
   Delay_us(40);
   if(Data) num |= 1<<(7-i);
   while(Data);
   }
  return num;
}
Output
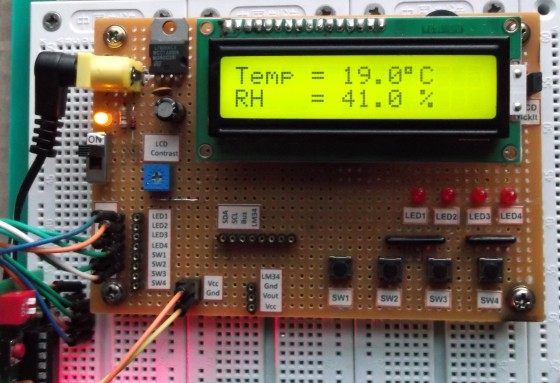
The accuracy of DHT11 is not as good as Sensirion’s SHT1X/7X series sensors, but it provides an easy and cheap solution to hobbyists for measuring relative humidity and temperature in parallel using a single device, which is sometime required in certain applications such as calculating the dew point.
Temperature and relative humidity measured by DHT11 sensor